https://github.com/DraconInteractive/Dracon.Frontend.Studio
Overview
My work on the UBF project (here) inspired me to achieve something similar on my own.
Node based graphs are a common feature in a number of tools. Both Unity and Unreal engines feature node systems, and many commercial tools use them for basic ‘block building’.
This project also provided me a good platform to expand on my frontend and JS knowledge. For this, I used the vue core, and the vue-flow plugin with vite for my bootstrapping.
The final result was a success!
Installation
The studio runs on a standard Node.JS installation pipeline. Clone the repository, and run npm install. This should install all of the required libraries for it to run.
Once the environment is setup, run npm run start to begin the app. This will print a local url such as http://localhost:5173 to the console. Opening this URL will open the studio for your use.
Components
The studio is comprised of a number of core components. These can be classified as the following.
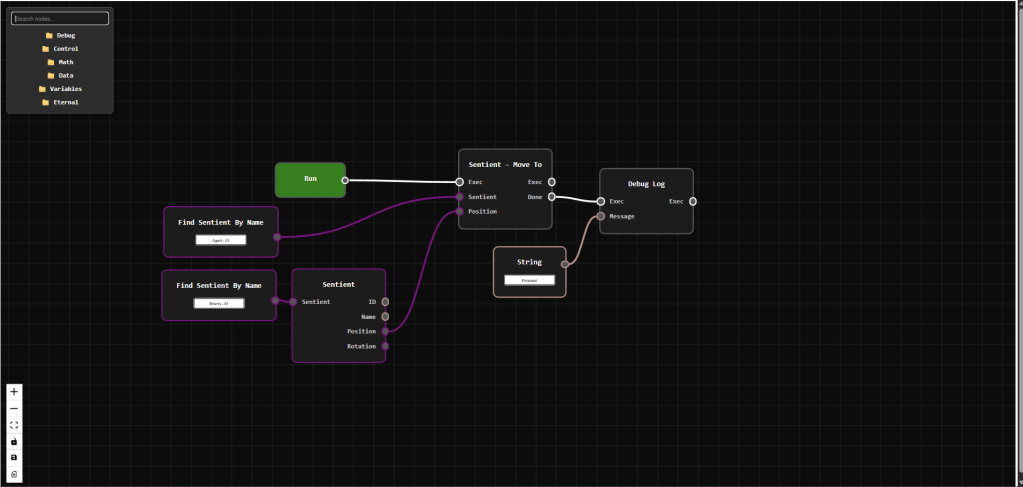
Nodes: Displays an interface on the studio depending on the node type. This generally includes a title, a set of input and output ‘pins’, and perhaps a value editor (see String node in image above). Node pins can be connected between nodes by clicking and dragging.
Node Menu: A menu that appears when the AddNode action is called. It holds a categorised list of what nodes can be added, and creates an instance of a node when that is implemented
Graph Menu: Located in the bottom right, it contains graph level actions such as zoom controls, and save/load buttons
Purpose
The purpose of this project is not just to be able to render a node graph. Being able to save a serialized version of the graph that can be parsed at runtime by another system was a primary goal.
This was achieved! The above image shows you the use of custom ‘Sentient’ nodes. This corresponds to an AI implementation in one of my game projects. The image shows a basic flow of an AI behaviour where it moves to another AI and executes a debug action.
The overall flow here was:
- Create graph
- Create nodes and link them
- Save and serialize graph
- Import graph to editor
- Run graph at runtime
While I had previously created similar work in the UBF project, I was very satisfied at achieving this full flow personally.
Code Overview
As a developer who’s experience primarily lay in Unity 3D and C#, this was my first major exploration into web-based frontend development. This presented a series of challenges, but I was happy with my ability to achieve the goals I had set for this application.
First I created a ‘BaseNode’. This was for all node types to derive from, and contains the bulk of the rendering logic.
I specified a list of properties that sub-types could use to modify the overall structure of the node, like so.
const props = defineProps<{
  id: string,
  data: any,
  title: string,
  body?: string,
  inputs?: HandleDef[],
  outputs?: HandleDef[],
  showToolbar?: boolean,
  actions?: string[],
  customClass?: string,
  handleSpacing?: number,
  bottomSpacing?: number,
  titleSpacing?: number,
  titleFontSize?: number,
  renderTitle?: boolean,
  renderBody?: boolean,
  renderSpacer?: boolean,
}>()
The booleans such as renderTitle, renderBody and renderSpacer allowed simple nodes to contract their body and render efficiently. An example of a node with no body or spacer is the ‘Run’ node.

Some nodes, however, needed to not only show the body and bottom spacer, but also to render custom value controls, like the String node. The body and customClass entries allowed for this.

An example of a node that derives from BaseNode is the DebugLogNode
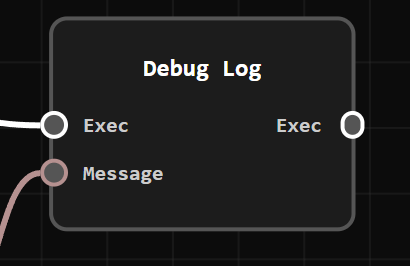
This node has a simple design, featuring just a title and a few pins.
<script setup lang="ts">
import BaseNode from '~/nodes/BaseNode.vue'

const props = defineProps(['id', 'data'])

const inputs = [
  { id: 'Exec', dataType: 'exec' },
  { id: 'Message', dataType: 'string' }
]
const outputs = [
  { id: 'Exec', dataType: 'exec' }
]

props.data.inputs = inputs
props.data.outputs = outputs
props.data.class = 'debug-log-node'
</script>

<template>
    <BaseNode
        :id="props.id"
        :data="props.data"
        title="Debug Log"
        :inputs="inputs"
        :outputs="outputs"
        :titleSpacing="35"
        :bottomSpacing="26"
        :render-title="true"
        :render-body="true"
        :render-spacer="true"
    />
</template>

<style>
.custom-node.debug-log-node {
  min-width: 50px;
}
</style>
Regarding the save/load features, this turned out to be very simple. I created a ‘sanitization’ function that retrieved the elements of the graph that I required, then used JSON.stringify to create a text representation.
Since I haven’t implemented file handling yet, this actually just copies the graph to the users clipboard like this.
const handleSave = async (): Promise<void> => {
  const flowData = toObject();
  const serialized = JSON.stringify(getSanitizedFlow(), null, 2);

  localStorage.setItem('last-saved-graph', JSON.stringify(flowData));

  try {
    await navigator.clipboard.writeText(serialized)
    showToast("Saved!")
  } catch (err) {
    console.error("Failed to copy to clipboard:", err)
    showToast("Saved, but failed to export", 3000)
  }
}
Similarly, the restoration/load function retrieves the last saved graph from local storage and creates a graph interface from that data. This is most useful since it runs on start, loading the last graph you were working on.
const handleRestore = (): void => {
  const saved = localStorage.getItem('last-saved-graph');
  if (saved) {
    try {
      const parsed = JSON.parse(saved)
      fromObject(parsed)
      console.log('Flow restored from localStorage.')
      showToast("Loaded!")
    } catch (e) {
      console.error('Failed to load flow from localStorage:', e)
      showToast("Failed to load!", 3000)

    }
  } else {
    console.log('No saved flow found.')
    showToast("No saved flow found.", 3000)
  }
}
Implementing a history mechanic (undo/redo) proved to have a very similar mechanic. I would just take snapshots of the current state of the graph and save them to a history array.
I understand that this could likely be made more efficient by simply saving what transformations were made, and reversing them, but this was a quick and simple implementation that met my own needs.
function undo() {
  if (historyIndex.value > 0) {
    historyIndex.value--

    const snapshot = history.value[historyIndex.value]
    const currentViewport = toObject().viewport

    fromObject({
      ...snapshot,
      viewport: currentViewport, // preserve current zoom/pan
    })
    showToast("Undone!")
  }
}

function redo() {
  if (historyIndex.value < history.value.length - 1) {
    historyIndex.value++

    const snapshot = history.value[historyIndex.value]
    const currentViewport = toObject().viewport

    fromObject({
      ...snapshot,
      viewport: currentViewport, // preserve current zoom/pan
    })
    showToast("Redone!")
  }
}
There is much more to explore, but these were some fun examples to point out! I hope you enjoyed this project, I look forward to expanding on it into the future.

Leave a comment