https://github.com/DraconInteractive/Dracon.Frontend.WeatherTodo
Overview
“Day” is a project I have undertaken to expand my frontend abilities, specifically looking at React development.
This ended up being a short and sweet project. I started with the idea of an app you can use to organise your day, but with an extremely simple scope:
- View the weather
- Interactable Todo list
I’m no stranger to utilising AI coding tools, so in full this ended up taking me no longer than a couple of hours. The largest hurdle here was parsing the generated code and taking what lessons from it that I could.
Creating this blog post has given me a perfect opportunity to break down the implementation of this app to assist in that process.
Installation
The studio runs on a standard Node.JS installation pipeline. Clone the repository, and run npm install. This should install all of the required libraries for it to run.
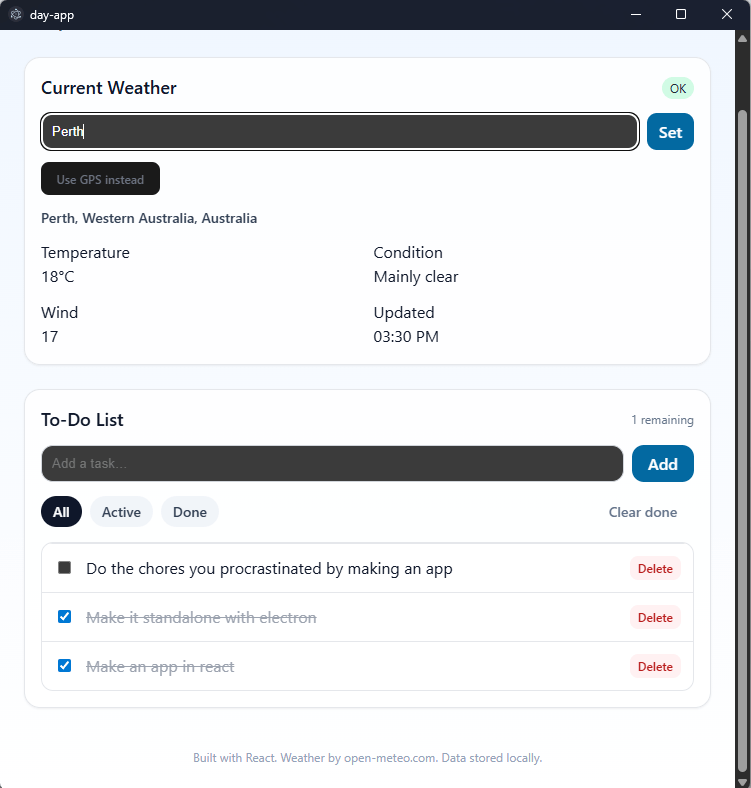
Once the environment is setup, run npm run dev to begin the app. This will print a local url such as http://localhost:5173 to the console, and it will open a standalone (and resizable) window with the app.
Components
As above, the two major components of this app are the Weather view and the Todo list.
The Weather area is comprised of three (3) components: LocationBar, Metric and WeatherPanel.
Weather Panel
The WeatherPanel is the parent object that contains the LocationBar and Metrics. The LocationBar is responsible for parsing user input containing geolocation, and the WeatherPanel will use that data to fetch location name and weather statistics. This data is displayed, and the Metric component is used for the individual weather statistics such as temp, condition, wind and time of update.
WeatherPanel – Location logic
Formatting adjusted for web display
{(!coords || pref.source === null) && (
    <div style={{ fontSize: 14, color: "#374151" }}>
          Geolocation may be blocked (HTTPS required). You can set a city manually below.
     </div>
)}

<LocationBar onPick={pref.setManualByQuery} />
{pref.name && (
    <div>
        <button
            onClick={pref.clearManual}
            style={{ fontSize: 12, color: "#6b7280" }}
            title="Use GPS when available">Use GPS instead
        </button>
    </div>
)}

<div style={{ fontSize: 14, color: "#334155" }}>
    {
        placeName &&
        <div style={{ fontWeight: 600 }}>{placeName}</div>
    }
    {
        !placeName && !loading && !error &&
        <div style={{ color: "#64748b" }}>Set a city or enable location…</div>
    }
</div>

{error && (
    <p
        style={{ fontSize: 14, color: "#b91c1c", margin: 0 }}>
        {error}
    </p>
)}
WeatherPanel – Metric logic
Formatting adjusted for web display
{data && (
    <div style={{ display: "grid", gridTemplateColumns: "repeat(2, minmax(0, 1fr))", gap: 12 }}>
        <Metric label="Temperature"
            value= {`${Math.round(data.temperature)}°C`}
        />
        <Metric label="Condition" value={desc} />
        <Metric label="Wind"
            value={`${Math.round(data.wind)}`}
        />
        <Metric label="Updated"
            value={formatTime(new Date(data.time))}
        />
    </div>
)}

{!data && !loading && !error && (
    <p
        style={{ fontSize: 14, color: "#64748b", margin: 0 }}
    >
        Waiting for data…
    </p>
)}
LocationBar
The LocationBar is an input-focused component for the user to enter their location in order for the WeatherPanel to use that to get geolocation.

It consists of a form that uses an injected ‘onPick’ to perform a geo-query hook found in hooks/usePreferredLocation.ts
If the query returns a result, it gets displayed and returned to the WeatherPanel. If not, an error message is displayed based on the query result.


Geolocation Hook
Formatting adjusted for web display
async function forwardGeocodeOnce(query: string) {
  const url = new URL("https://geocoding-api.open-meteo.com/v1/search");
  url.searchParams.set("name", query);
  url.searchParams.set("count", "1");
  url.searchParams.set("language", "en");
  const res = await fetch(url.toString());
  if (!res.ok) throw new Error(`HTTP ${res.status}`);
  const json = await res.json();
  const r = json?.results?.[0];
  if (!r) return null as null | { lat: number; lon: number; label: string };
  const label = [r.name, r.admin1, r.country].filter(Boolean).join(", ");
  return { lat: r.latitude, lon: r.longitude, label };
}
LocationBar Form
Formatting adjusted for web display
return (
    <form
      onSubmit={async (e) => {
        e.preventDefault();
        if (!q.trim()) return;
        setBusy(true); setMsg(null);
        const r = await onPick(q.trim()).catch((e) =>
            {
                setMsg(e?.message ?? "Failed"); return null;
            }
        );
        if (!r) setMsg("No results for that place");
        setBusy(false);
      }}
      style={{ display: "flex", gap: 8 }}
    >
    <input
        placeholder="Enter a city (e.g., Perth)"
        value={q}
        onChange={(e) => setQ(e.target.value)}
        style={{
            flex: 1,
            padding: "8px 10px",
            borderRadius: 10,
            border: "1px solid #d1d5db"
        }}
    />
    <button disabled={busy}
        type="submit"
        style={{
            padding: "8px 12px",
            borderRadius: 10,
            background: "#0369a1",
            color: "white", border: 0
        }}
    >
        {busy ? "Searching…" : "Set"}
    </button>
    {msg &&
        <span style={{
            marginLeft: 8,
            fontSize: 12,
            color: "#b91c1c"
        }}>
            {msg}
        </span>
    }
</form>
Metric
Our final weather component, the Metric component focuses on displaying the four (4) items returned from the geo-location query; Temperature, Condition, Wind and Updated

This component is very simple, and is mostly just used for display purposes.
Metric Function
Formatting adjusted for web display
export default function Metric({ label, value, hint }:
    { label: string; value: string; hint?: string })
    {
        return (
            <div className="rounded-xl bg-slate-50 p-3">
            <div className="
                text-xs uppercase
                tracking-wide text-slate-500"
            >{label}</div>
            <div className="
                text-xl font-semibold text-slate-800"
            >{value}</div>
            {hint && <div className="
                text-[10px] text-slate-400"
            >{hint}</div>}
    </div>
  );
}
TodoList
The TodoList component is comparable to the WeatherPanel component in that it contains the primary logic for its functionality set.
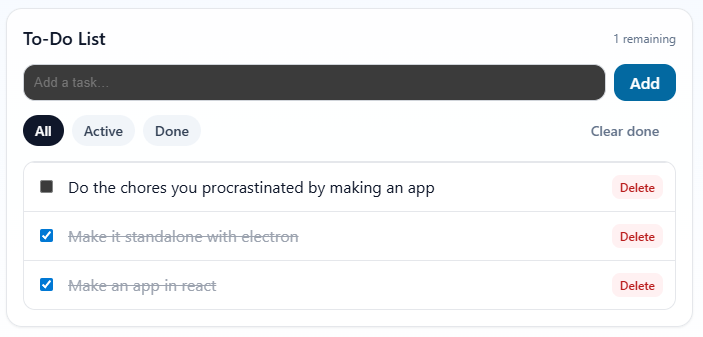
The TodoList is comprised of an array of Todo items structured like so:
type Todo = {
    id: string
    title: string
    done: boolean
    createdAt: number
}
These items are filtered according to three values, “all”, “active” or “done”.
The functionality is basic, allowing the user to add items, toggle them (aka complete them), remove them and to clear all completed items from the list.
The Todo items and their filters / query has a simple setup:
const [items, setItems] = useLocalStorage<Todo[]>
    ("dayapp.todos.v1", []);

const [filter, setFilter] = useLocalStorage<Filter>
    ("dayapp.filter.v1", "all");

const [query, setQuery] = useState("");
Note the use of ‘useLocalStorage’. This is a shortcut for a persistence function that uses the key to access the universal localStorage function to store information in a browser. I could have done a backend api to store tasks in, but I felt that was out of scope for this project.
The list manipulation functions all make simple mutations to the setItems array. For example:
Formatting adjusted for web display
function addTodo(title: string) {
    const t = title.trim();
    if (!t) return;
    setItems((prev) => [
        {
            id: crypto.randomUUID(),
            title: t,
            done: false,
            createdAt: Date.now()
        }, ...prev
    ]);
    setQuery("");
    inputRef.current?.focus();
  }
Filtering is achieve by a “visible” filter const.
const visible = useMemo(() => {
    let xs = items;
    if (filter === "active") xs = xs.filter((x) => !x.done);
    if (filter === "done") xs = xs.filter((x) => x.done);
    return xs;
  }, [items, filter]);
I’m not going to go over the rest of the TodoList here. It’s quite lengthy and almost all focused on display logic rather than mechanics. Feel free to check it out at the repo linked at the top!
Conclusion
Working in the react frontend space is new to me. This project was a great opportunity for exploration, but I have a lot more to learn and I will definitely be heading straight onto something new.
Let me know if you have any suggestions for cool projects!

Leave a comment